Chrome Extension ContentScript
A ContentScript is a JavaScript file that runs in the context of a web page loaded in the browser. It allows extensions to interact with the page's Document Object Model (DOM), enabling features like modifying content, extracting data, or injecting custom scripts. However, ContentScripts operate in a specific environment known as the World context, which defines how they interact with the web page and other scripts.
Understanding the ExecutionWorld Context
In Chrome extensions, ContentScripts execute in one of two "worlds":
- Isolated World (Default): ContentScripts run in a separate JavaScript environment from the web page's scripts. This isolation ensures that the extension's code does not conflict with the page's JavaScript variables, functions, or libraries. While ContentScripts can access and manipulate the page's DOM, they cannot directly access the page's JavaScript objects or variables unless explicitly shared (e.g., via
window.postMessage). - Main World: With the
world: MAINproperty in the extension's manifest (introduced in Chrome 95), ContentScripts can execute in the same JavaScript environment as the web page's scripts. This allows direct access to the page's JavaScript context, including variables and functions, but it comes with risks, such as potential conflicts with the page's code or security vulnerabilities. Once a script is injected into the main world, it loses access to the Chrome API.
Important Tips and Notes
- Isolated Scripts cannot access the host's objects and variables due to their execution context; however, since they can access the DOM,
postMessageserves as the perfect opportunity to exchange information between both worlds.
Practical Example
The following code injects a ContentScript into a Shopify Store platform to extract cart information and send the data to the extension.
Step 1: Research and Information Gathering
This step is crucial, and Google DevTools plays a key role in the process. It involves carefully observing and collecting as much information as possible to understand the URL patterns and payload structure needed for data extraction.
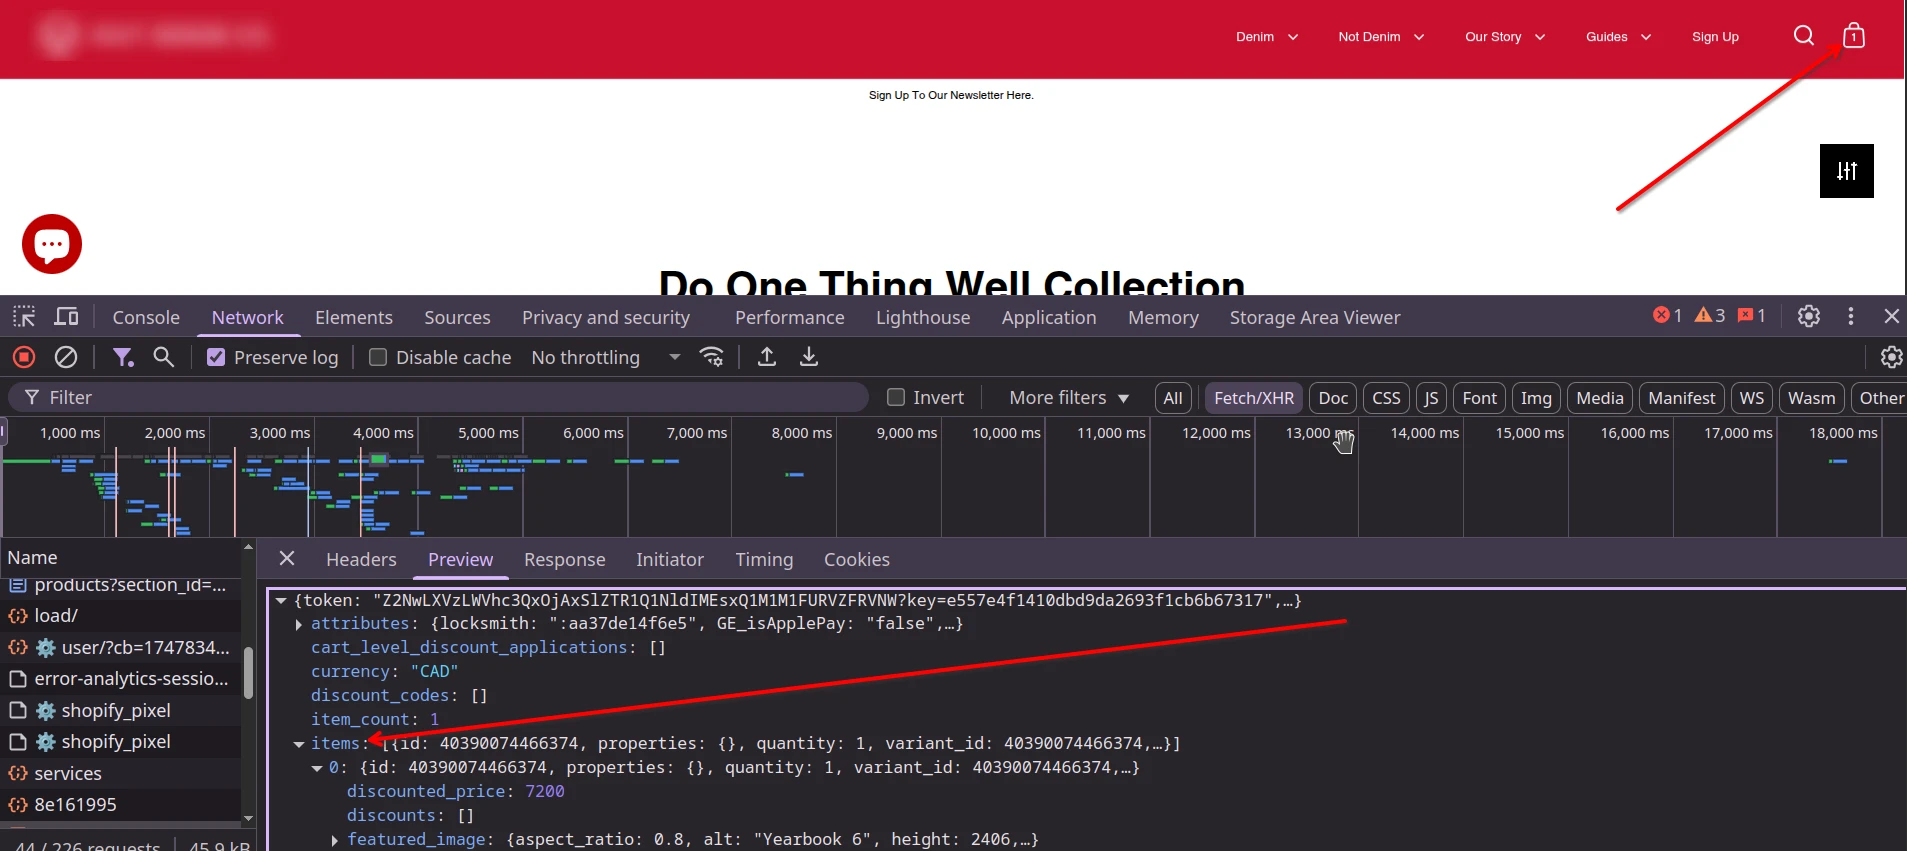
The response payload returned by Shopify when a cart is added cannot be accessed by the default Isolate World environment of the ContentScript, even when using the chrome.webRequest API.
Step 2: Adopt a Strategy
Implementing a strategy is effective after gathering sufficient information, but it requires a solid understanding of the DOM, Browser APIs, and Chrome extension architecture. Familiarity with concepts like Monkey Patching, Cross-Window Communication, and JavaScript's prototype-based nature is crucial for modifying existing behavior and adding new functionality.
The current approach to data extraction involves injecting a script that alters the `XMLHttpRequest` (XHR) and `Response` objects. This technique, known as Monkey Patching, dynamically modifies existing objects to achieve the desired functionality.
Step 3: Execution Plan
Having explored execution contexts (ISOLATED vs. MAIN), Cross-Window Communication, and the payload from the host page, we can now decide how to inject the script. Content scripts can be injected programmatically via the service worker or declaratively through the manifest.json. For this tutorial, we will use the manifest.json approach.
{
    "matches": [
        ""
    ],
    "run_at": "document_end",
    "js": [
        "interceptor.js"
    ],
    "world": "MAIN"
}
The manifest instructs the interceptor.js source to be injected into the main page. Below is the complete code for the interceptor.js file.
const SUPPORTED_CART_URLS = ['cart.js', 'cart.json', 'cart/add.js', 'cart/update.js', 'cart/change.js', 'cart/clear.js', 'cart/remove'];
const REGEXP_PATTERN_STRING = SUPPORTED_CART_URLS.join('|');
const REGEXP_PATTERN = new RegExp(REGEXP_PATTERN_STRING, "gi");

const responsFunc = Response.prototype.json;
// Modify the Response used by Fetch to get Shopify Cart.js response
Response.prototype.json = async function() {
    const data = await responsFunc.call(this);
    if (REGEXP_PATTERN.test(this.url)) {
        const urlParams = new URL(location.href);
        const domain = urlParams.hostname;
        postMessage({ type: 'add-to-cart', data: data, url: this.url }, "*");  // Sends to the Chrome extension via onMessage
    }
    return data;
}
// Modify the XMLHttpRequest to get Shopify Cart.js response
const xhr = XMLHttpRequest.prototype.open;
XMLHttpRequest.prototype.open = function(method, url) {
    this.addEventListener('load', function() {
        if (REGEXP_PATTERN.test(url)) {
            const data = JSON.parse(this.responseText);
            const urlParams = new URL(location.href);
            const domain = urlParams.hostname;
            postMessage({ type: 'add-to-cart', data: data, url: this.url }, "*"); // Sends to the Chrome extension via onMessage
        }
    });
    xhr.apply(this, arguments);
}
Explanation
After the code is injected, the script carries out several operations, including:
- To maintain the original implementation, we ensure the default behavior remains unchanged. For
Response.prototype.json, which returns response data, we intercept the data and send it to our extension viapostMessage. A similar strategy is used forXMLHttpRequest, though implemented differently. - Regular expressions are used to match specific URLs.
Receiving the Payload from the Extension
window.addEventListener("message", async (event) => {
    if (event.data.type === 'add-to-cart') {
        console.log(event);
    }
});
Alternative
In conclusion, by leveraging shared access to localStorage, both the extension and the host page can communicate indirectly. This allows the script to store data in localStorage, which the extension can then read and process, enabling a simple yet effective method for data exchange without disrupting the original page behavior.